

This page documents the process I went through to create my first
Animatronic Wheatley. Over the course of two months in 2014, I spent my
free time assembling the first of the greatest projects I’ve ever
attempted. Thankfully, everything worked out and I had a working
Wheatley! I know he might look a little rough around the edges but he
was the first one I built. Be sure to check out Wheatley v2.0!
Thanks for viewing!
P.S. If you’re feeling rather lazy, I won’t be super-offended if
you just scroll to the video at the bottom of the page. Go ahead! 🙂
Intro
Disclaimer:
This is NOT a step-by-step, exactly detailed, how-to-make-your-own
Wheatley document. To tell you the truth, I didn’t quite keep track of
the whole build myself. I’ve have a few drawings here, some notes there,
and a couple videos, but no definite instructions for each step.
My outlook on it is this: The fun is in doing it on your own! Sure I Googled for reference photos and videos, but no one told me how to put Wheatley together piece by piece. It was a discovery process that yielded more problems to solve and thus, more fun than I ever imagined.
For those of you who don’t know who Wheatley is, Click Here!

There were a few other Wheatleys built before mine that deserve credit as being a great part of my inspiration:
- Furin’s Wheatley Puppet
- LauraSan’s Wheatley Puppet (Based on Furin’s)
- Alexander, Brooks, and Connor’s Animatronic Wheatley
(A Freshmen Engineering Project for Drexel University) - Bio-Bot’s 1/2 Scale Wheatley Project (Unfinished)
Without these other projects, I would never have thought my Wheatley possible. If you’d like to view each of these other projects and the others I’ve found, Click Here.
Brainstorming
When I decided to start this project, I made several schematics and drawings of all my ideas on how to make this project work. Most of these drawings are now lost to me, due to there being so many. At one point they littered almost every scrap of paper I owned because I was drawing them whenever time would permit. Here’s what is left of them:


Also, the Model Viewer included with the Portal 2 Authoring Tools on Steam really helped me visualize what type of motion Wheatley has and what I might be able to do.
Parts
Building Wheatley took a bit of time and money: Two months and about $350. I was in my Senior year of High School and from February to April of 2014 (the duration of the project), I was attending school and then working at my job right afterwards. Factor these two things out and Wheatley probably could’ve been completed in three to four weeks. As for the money, I estimate maybe $100-$150 on wasted materials (things that I didn’t end up using). One of the hardest, most frustrating, yet most enjoyable parts of doing a project like this is the fact that you’re messing around, tweaking things here and there, trying to find what works. Sure it would’ve been cheaper and more efficient to have a perfect list of everything I would’ve needed, but the fun is in the problem solving! Do I regret wasting some money on this project? A little. But the outcome made up for it.
As far as parts go, let me give you an idea of what I used:
- Arduino UNO Rev. 3
- 20 Second Recording Modules
- Velleman Sound-to-Light Kit
- 2 Standard Servos
- 1 Micro Servo
- 1 Servo Tester
- 2 Axis Joystick
- 22 Gauge Hookup Wire
- 2 12″ Styrofoam Hemispheres
- Rayovac Value Bright LED Flashlight
…just to name a few. Please note that this is NOT a complete parts list. I don’t remember every piece that went into Wheatley because I didn’t document the build process. At the time, I was mainly concerned with getting him finished before my deadline.
Here’s a video of the first thing I assembled: The Velleman Sound-to-Light Kit.
Later on, I decided to replace the LEDs with a small Angel Eye I found on eBay.
Movement
Once I had most of my materials, the next step was figuring out how to bring Wheatley to life. Starting simple, I focused on his eyelids. As you might have seen in the Brainstorming images, I had originally designed his eyelids to be pulled by fishing line, with springs to put them back into place. Finding this to be too difficult and impractical, I eventually decided on using a Micro Servo and a gripper kit to open and close both lids simultaneously. After tweaking the servo and attaching the unfinished eyelids, this was the result:
As far as Wheatley’s overall movement, that turned out easier than I expected. After digging around on my favorite DIY site Instructables.com, I discovered a wonderful guide by biomech75 titled Arduino + 2 Servos + Thumbstick (joystick). The Arduino code from this article became the base of Wheatley’s movement. After making some adjustments to the code so Wheatley moved properly, I assembled the Servo mount using a wooden dowel, smaller wood pieces, and a piece of scrap metal. I also had to use a couple of rubber bands to counter the weight of the faceplate. Here’s a video of him moving for one of the first times:
Sorry about the video cutting out at the end: my phone died.
Underlying Cosmetics
After planning carefully and marking the Styrofoam with masking tape and permanent marker, I began carving out the details of Wheatley’s inner and outer shells. Using an X-Acto Knife (marked to control depth) and a Styrofoam cutter (for the bigger holes), it only took a couple days to get the shells looking like a Personality Core. I also used the X-Acto method to carve the details on and around where the faceplate sits. Here is a photo of what it looked like when I was done:

You can also see the handles in this picture. They were made out of cardboard, wooden dowel, coat hanger wire, hot glue, wooden buttons, and a bit of Hula Hoop. I used some metal brackets I found at Wal-Mart to hold them in.
After the shell was completed, I turned my attention to the most pivotal part of Wheatley: His faceplate. Designing and building the faceplate to allow his eyelids to function as they should was another great challenge. I ended up cutting the Styrofoam disk that I started with into 12 separate pieces and then gluing/taping them back together. This probably could’ve been avoided, but due to my material, budget, and skill limitations it was the only way I was able to remove enough material to allow his eyelids to open and close. When all was said and done, here’s what it looked like:

Moving on to the eye itself, it ended up being one of the most time-consuming parts of this project. I had to use a candle to heat up a pocket knife in order to carve out the plastic reflector from a flashlight. That whole process took about two hours. Once that was out, it was only a matter of drilling a couple of holes for the lighting wires, gluing the lights in, and adding the graphics over the top. I used varying materials for the graphics, such as printer paper, clear plastic, and stickers. Once the eye and the faceplate were assembled together and the eye turned on, it was as if life was breathed into Wheatley. I think I cried a little!
Wiring
This project really helped me understand and appreciate the power of Printed Circuit Boards. What a time saver! Unfortunately, my skills were severely lacking in this aspect, and I actually laughed when the thought of making a custom PCBs crossed my mind. Thus, while this project did teach me how to solder, I wired everything by hand. Here’s a picture of what it looked like before I consolidated all the wires and assembled the controller:
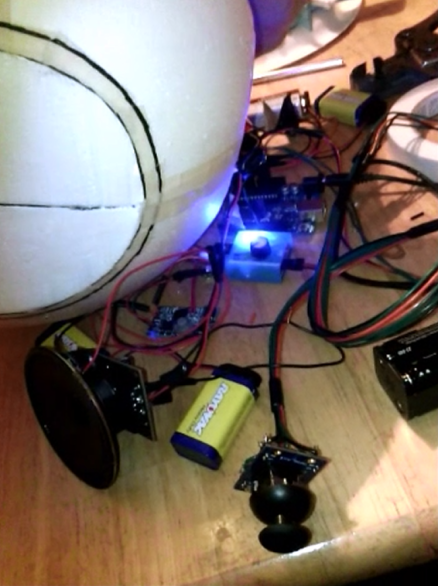
I had a lot of people ask me if I had used a PS3/Xbox controller to start with. While that would’ve been cool, it wasn’t very time or cost effective, so I just stuck with RadioShack parts. Starting with leftover wooden dowel/wood pieces, I built something that looked like the letter L. Then I started attaching the sound modules (I cut the mic and record buttons off of them to make the phrases permanent), the joystick, and the servo tester (with an improvised trigger) via hot glue. The batteries for the sound modules were directly attached to the controller as well. After making sure everything worked, I fed the wires through a cord organizer and wrapped the controller with electrical tape. Here’s the before and after:


I also added another sound module with a re-record ability, so I could program other various phrases for Wheatley to say.
Another fun fact: Wheatley runs comfortably on 109.5 Volts split up between AAAs, AAs, and 9v batteries. While we were at Comic-Con his batteries were housed inside his body. After it was over I moved them outside his body to be near the controller, making sure that I don’t have to open Wheatley up ever again.
Now, I know what some of you are thinking (because I was asked this several times):
Why not just hook him up to a car battery or something? Why all the batteries?
The answer is simple: Portability and Ease-of-Access. When I started this project, I didn’t know that Wheatley would be coming to the Comic-Con with me. As soon as I decided he was, I knew that he needed to be portable. AAAs, AAs, and 9V batteries were the simplest portable power source I could find at the time.
Finish Details
Once everything was built and in working condition, the next step was to make Wheatley look like Wheatley. I started by covering his shell in paper mâché. Credit to Scott Stoll for the wonderful recipe I found on his awesome Halloween website, www.stolloween.com. While mixing the paste, I also added a splash of bleach to extend the life of the project. For the paper, I used Viva paper towels because they absorb the mixture very well, add durability and texture, and sand easily when they are dry.
As for the paint-job, I am very grateful for my neighbor and oldest friend Hydee. She has been creating art for longer than I can remember, and her skills and styles are uniquely awesome! She graciously volunteered to do the majority of the final painted details on Wheatley. We used flat white spray-paint for the shells and gloss grey spray-paint for the handles (gloss was the only grey Wal-Mart had at the time!). The faceplate, eye lids, parts of the handles, and detail on the shells themselves were all done with acrylic paint. On the day we painted, we stayed up until 3:30am! Here’s a video of what it looked like after we were done:
After I completed the wiring for the controller, Hydee came back and did a final touch-up, adding the cracks, chips, scrapes, and dents, as well as some printed graphics. We finished the paint job off with a matte clear-coat.
Finished Wheatley
And now: the moment you’ve all been waiting for….
Wheatley!
Overall, I was very happy with the results of this project. There were some bumps along the way, but as far as backyard animatronics go, I think I did a pretty good job for a first attempt. Just in case they weren’t clear in the video, here are the audio clips I used for this project:
Note: Because it is re-programmable, the sixth sound clip changed frequently. It is not listed here because it wouldn’t be current all of the time.
Praise for Wheatley v1.0
This is some of the praise that we received on the first Animatronic Wheatley Project. I say “we” because my cousin Alisha would’ve hit me if I hadn’t mentioned her. She was the one who originally introduced me to the Portal franchise and has a really big soft-spot for Wheatley. She supported me emotionally (and a couple times financially) throughout this whole project, helped keep my morale up, held things while I glued, she helped paint a bit, and read me fan-fiction while I worked. She also went with me to Comic-Con, filling my need for a Test Subject. Words cannot express how thankful I am for her, both on this project and everywhere else.
“I took a look at your blog and was impressed by what I saw (looks much more polished than ours was). It’s making me want to actually get back and make our Wheatley V2 that we’ve been planning to work on for awhile. We’ve had the Arduino purchased and have just been too caught up with school.

~ The Blue Sky Support Group
applebagelunicron.tumblr.com

~ Mercedes VFire
Cosplay Stitch and Seam


Well, that’s it! I hope you’ve enjoyed reading about my first Wheatley project. Please feel free to ask questions or comment below. Have fun and remember:
the cake is a lie…

Or is it?